SFTP file transfer reference
SSH is the delivery mechanism. SCP is a single-file copy protocol. PGP is used to provide encryption of data.
The intended audience of this document is:
- Developers who wish to create SSH and PGP key pairs to enable SFTP connectivity.
- Developers who wish to create command line scripts for encryption/decryption and connectivity.
Overview
Secure Shell (SSH) provides an open protocol for security network communications which is less complex and expensive than hardware-based VPN solutions.
Secure Shell client/server solutions provide command shell, file transfer, and data tunnelling services for TCP/IP applications. SSH connections provide highly secure authentication, encryption, and data integrity to combat password theft and other security threats.
Westpac provides an SSH server to allow customers to either push files to Westpac or poll for files.
This page details the setup of SSH and PGP so that a customer may interact with Westpac using these technologies.
Transfer protocols
Secure Shell (SSH)
SSH is the delivery mechanism.
It is the encrypted protocol that allows secure communications between two parties. The file transfer protocol that lies under SSH can be either SFTP or SCP.
Single-file Copy (SCP)
SCP is a single-file copy protocol. It allows a single file to be transferred between two hosts non-interactively.
Compare this to the standard copy command across two network shares.
SSH File Transfer Protocol (SFTP)
SFTP is an interactive protocol. It allows browsing of the remote host as well as file transfers.
Compare this to the standard interactive FTP protocol.
There are many SSH clients available. These are both free and commercial products. The choice of the SSH (must support SSH2) is at the discretion of the customer. Westpac can recommend the following SSH clients:
Security
As is common with SSH, only your public SSH key is required to establish the connection to the Westpac SCP/SFTP server.
All files transferred must however be encrypted and digitally signed between Westpac and the customer site using PGP/GPG2 (Westpac banking security policy).
This serves two purposes:
- Ensure that the data cannot be viewed by unauthorised sources when at rest.
- Provide non-repudiation. Through the use of public/private keys, data can be digitally signed. By signing the file both Westpac and the customer can be assured that the data originated from a known source and it has not been tampered with.
Westpac recommends the following products for encryption and digitally signing of data:
Guaranteed delivery
SSH does not have a guaranteed delivery mechanism as such, but the processes that are wrapped around the file transfer can ensure delivery. This needs to be broken down into two major areas of discussion:
Pushing files to Westpac
Once a customer transfers a file to Westpac, after a small period of time it is swept into the file processing engine. As part of the PGP/GPG2 decryption process a CRC check is carried out on the file. If it does not pass the CRC check, an email will be sent to notify the customer.
Customer polling files
When a customer tries to decrypt a file the same CRC checks are applied as built into PGP/GPG2. If the file is corrupted the CRC check will fail and error will be generated.
It is the responsibility of the customer to ensure that the scheduled tasks have been run on their side to ensure that polling has taken place as Westpac has no control over this.
Quick start
- Qvalent implementation consultant creates an iLink test account for the customer's technical contact.
- Customer contact completes iLink connectivity form in test iLink.
- Qvalent implementation consultant arranges configuration of the test SFTP server.
- Customer configures 3rd party software.
- Customer codes SFTP scripts.
- Customer undertakes testing in the test environment.
- Once customer is satisfied that testing is complete a sign off email is required to progress to production.
- Qvalent implementation consultant creates an iLink production account for the customer's technical contact.
- Customer contact completes iLink connectivity form in production.
- Qvalent implementation consultant arranges configuration of the production SFTP server.
- Customer tests the SFTP connection in the live environment.
- Once this testing is successful customers can perform low value live testing of the other Westpac products are that are being implemented.
Transfer overview
- Initial key exchange.
- Pushing a file to Westpac.
- Polling a file from Westpac.
- Receiving files from Westpac.
- File and directory names.
- Network connectivity.
- Environments.
Initial key exchange
Push / Poll
This is when the customer pushes files to Westpac and then polls for files to pick up from Westpac.
To set up the SSH transfer, two keys must be provided to Westpac.
- A 2048 SSH-2 RSA key - used to verify the identify of the SSH client that the customer establishes with Westpac.
- A PGP public key - used to verify the digital signature of the file that is transferred between the customer and Westpac.
Provide these keys by uploading them in the iLink Connectivity Setup screens.
In return Westpac will provide:
- Base 64 encoded known host key of Westpac's production SSH server - used by the customer to validate upon initial connection.
- Westpac's PGP key - used by the customer to encrypt a file that is sent to Westpac (the customer signs the file with their private key).
Push / Push
This is when the customer pushes files to Westpac and Westpac pushes files to the customer.
To set up the SSH transfer, three keys must be provided to Westpac.
- A 2048 SSH-2 RSA key - used to verify the identify of the SSH client that the customer establishes with Westpac.
- Base 64 encoded known host key of the customer's production SSH server - used by Westpac to validate the customer's SSH server upon initial connection.
- A PGP public key - used to verify the digital signature of the file that is transferred between the customer and Westpac.
Provide these keys by uploading them in the iLink Connectivity Setup screens.
In return Westpac will provide:
- A 2048 SSH-2 RSA key - used to verify the identity of the SSH client that Westpac establishes with the customer's SSH server.
- Base 64 encoded known host key of Westpac's production SSH server - used by the customer to validate upon initial connection.
- Westpac's PGP key - used by the customer to encrypt a file that is sent to Westpac (the customer signs the file with their private key).
Pushing a file to Westpac
To push a file:
- Encrypt the data using Westpac's public key and sign the encrypted data with the customer's private key. When messages are encrypted they must be ASCII armoured and compressed.
- Give the file to the SSH client for transmission. SSH connects to the remote computer using connection details provided by Westpac. Westpac validates the 2048 SSH-2 RSA key that was exchanged during the Initial key exchange.
- Once a connection is established, the file is transferred to the destination site.
- Westpac detects the file and after a period of time sweeps the file out of the uploaded folder. The digital signature is checked against the customer's public key. If this matches, the file is decrypted using Westpac's private key.
Once these security aspects of the file have been verified, the file is then processed.
Polling a file from Westpac
To poll a file from Westpac:
- Westpac encrypts the file using the customer's public key. Westpac then ASCII armours the file, then signs the file with Westpac's private key. The file is placed in a directory ready to be picked up.
- The customer's SSH client connects to the remote computer using the SSH-2 key that was exchanged during the Initial key exchange.
- Once the customer connects, the customer performs a
GETto retrieve the file. This is done based on the file naming convention agreed on. - Once the customer has fetched the file back to their site, they check the digital signature against Westpac's PGP public key.
Once these security aspects of the file have been verified, the file is then processed.
Westpac will keep the file on it's SSH server for 30 days. After 30 days Westpac will automatically delete the file.
Receiving files from Westpac
A customer may wish to implement push-push SFTP. This is where Westpac's server puts files onto a SFTP server on the customer's network.
- Westpac encrypts the file using the customer's public key. Westpac then ASCII armours the file, then signs the file with Westpac's private key. The file is placed in a directory on the customer's SFTP server.
- Once the customer has detected that they have received a file, they should check the digital signature against Westpac's PGP public key. If this matches then the file is decrypted using the customer's private PGP key.
Once these security aspects of the file have been verified, the file is then processed.
File and directory names
File names can be any format as long as they contain standard ASCII characters that are valid for file names.
Westpac recommends:
- File names contain a date stamp.
- File names do not contain spaces (as this makes SSH command line calls difficult to build).
Destination directories and file names are agreed on between the customer and Westpac. However, in most cases files are created with default file names adhering to the recommendations above.
Network connectivity
SSH will function on a variety of platforms and IP based networks. This includes the Internet, Frame Relay and ISDN.
As part of the iLink connectivity setup you must provide the external IP address of your server running the SSH client. You must also take into account proxy servers.
Westpac will then modify it's firewall to allow your server access to Westpac's SSH server on port 22.
You may also need to engage your own network staff to allow your SSH client to connect on port 22.
Environments
| Environment | Type | Address |
|---|---|---|
| Test | Internet | Configure SSH to send to ssiw.support.qvalent.com (203.39.159.31) on port 22 |
| Test | Dedicated leased line (Frame relay, ISDN, dial or Ethernet) | Configure SSH to send to 10.168.252.4 on port 22 |
| Production | Internet | Configure SSH to send to ssiw.qvalent.com (192.170.86.151) on port 22 |
| Production | Dedicated leased line (Frame relay, ISDN, dial or Ethernet) | Configure SSH to send to 10.120.16.32 on port 22 |
iLink connectivity setup
In the early stages of your Westpac project you will be asked to provide the contact details of the IT person who will be responsible for setting up your connection.
Once these details are received you will be provided with an iLink login to enter your IP addresses.
The iLink connectivity process has the following steps:
- The Qvalent implementation consultant will provide the user's technical contact with a login to the iLink test instance.
- Fill in the setup connectivity form and submit.
- Notify your Qvalent and Westpac implementation managers that you have completed the connectivity form.
- The Qvalent implementation consultant will configure the file routing and notify all stakeholders when this is done.
- User to send and receive test files to confirm the connection.
- Once the Qvalent implementation consultant has received confirmation that all relevant testing has been completed steps 1 - 5 will need to be repeated in the production environment.
iLink URLs
| Environment | URL |
|---|---|
| Test | https://ilink.support.qvalent.com |
| Production | https://ilink.westpac.com.au |
Setup connectivity form
To setup your connectivity, click the Connectivity menu option at the top of the screen, then click the Setup connectivity button.
The Setup connectivity page will be displayed where you can enter your details:
- Contact emails - Add any additional email addresses that should receive connectivity related emails.
- PGP key - Before files are sent via SFTP they are encrypted, the user's PGP public key is required to decrypt these files before processing them in the messaging server.
- PGP signing key (optional) - If you require a separate PGP signing key you can provide it here. Otherwise, the provided PGP key will be used for both encryption & signing.
- SSH key - The SFTP solution using public key authentication as opposed to passwords. The user's SSH public key is required to authenticate requests.
- IP addresses - The solution has a white list of IP addresses accepted for each user. Users need to provide the IP address or addresses that their incoming requests will be coming from, this is the external IP address taking into account any proxy servers or other externally facing network infrastructure. This can be found by logging on to iLink on your server and taking the browser address shown in the IP addresses section of the connectivity form.
Additionally, for customers who require Westpac to push files to their SFTP server, the following fields are also required:
- Your SFTP server details - The fields in this section are the details that Westpac uses when connecting to the user's SFTP server to place files. The login provided for this connection will need to have privileges to write to the directory provided. Your known host key will be used to verify your server's identity when iLink connects to it. The known host key is usually a long string of letters and numbers. You can also enter an alternate known host key if you have multiple servers behind a load balancer.
Getting the Westpac server's details
After you submit the Connectivity form it will be processed over the next 3-5 days. Once it is set up you will receive an email notifying you to begin testing. User's with access to iLink's Connectivity Setup details will see the following:
- Westpac's PGP key - This is the public key that you will need to use to decrypt the files you receive from iLink.
- Westpac's SSH known host key - This is the public SSH host key of the SFTP server that you will need to accept during your first connection to the Westpac server.
- Your keys - You can use these fields during testing to confirm which keys you have loaded into iLink. This will only be displayed if encryption is enabled.
- Westpac's SFTP server details - This section contains the SFTP username to enter to connect to the server and the directories for placing (incoming) and retrieving (outgoing) files.
Software installation
The following software is required.
| Software Type | Recommendations |
|---|---|
| SSH Client | Customer nominated, but it must be SSH-2 compliant. WinSCP or OpenSSH. |
| PGP | PGP eBusiness Server, Gpg4win, or GnuPG. |
Installation instructions are available for:
- OpenSSH and GnuPG for Unix.
- WinSCP and Gpg4win for Windows.
Supported SSH Clients
Your SSH client must support SHA256/512 for Host key negotiation, and CTR/GCM ciphers for SSH tunnel encryption.
Typical clients that support this include:
| Client | Minimum version |
|---|---|
| OpenSSH | 7.2 |
| WinSCP | 5.20 |
| JSch based client | 0.2.0 |
| Maverick Legacy Client | 1.7.17 |
For further details see:
OpenSSH and GnuPG
OpenSSH is common on Unix systems and is usually installed by default. Below is an overview on establishing an SFTP session with Westpac using OpenSSH. GnuPG is used to generate a GNU GPG2 key-pair for file encryption.
Generating the SSH keys
To generate the SSH key-pair:
# ssh-keygen -b 2048 -t rsa -C "<Company Name> SSH Key"This will generate a 2048 bit RSA key-pair. Substitute <Company Name> with your company name. This helps identify the owner of the key. If you enter a passphrase you will not be able to automatically script the SFTP or SCP session as it will stop each time and prompt you.
Example of they key generation
# ssh-keygen -b 2048 -t rsa -C "Acme SSH Key"
Generating public/private rsa key-pair.
Enter file in which to save the key (/root/.ssh/id_rsa):
Enter passphrase (empty for no passphrase):
Enter same passphrase again:
Your identification has been saved in /root/.ssh/id_rsa.
Your public key has been saved in /root/.ssh/id_rsa.pub.
The key fingerprint is: 86:e3:c6:f6:b2:b7:be:92:c8:17:da:d6:9e:6f:c2:11 Acme SSH Key
If you accepted the default locations the keys will be in the ~/.ssh directory. The private key will be named id_rsa and the public key will be called id_rsa.pub. Provide a copy of the id_rsa.pub key to Westpac in the iLink Connectivity Setup.
Example
# cd ~/.ssh
# ls
authorized_keys2 id_rsa id_rsa.pub known_hosts
#
Generating the GnuPG RSA keys
The generated keys are located in the ~/.gnupg directory.
# ls ~/.gnupg
gpg2.conf pubring.gpg2 pubring.gpg2~ random_seed secring.gpg2 trustdb.gpg2
#
Ensure that you extract your public RSA key and provide it to Westpac in the iLink Connectivity Setup. Also ensure you import Westpac's public key.
WinSCP and Gpg4win
Installing Gpg4win
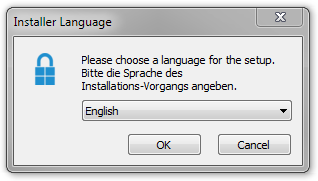
Step 1: Run the installer and select your language.
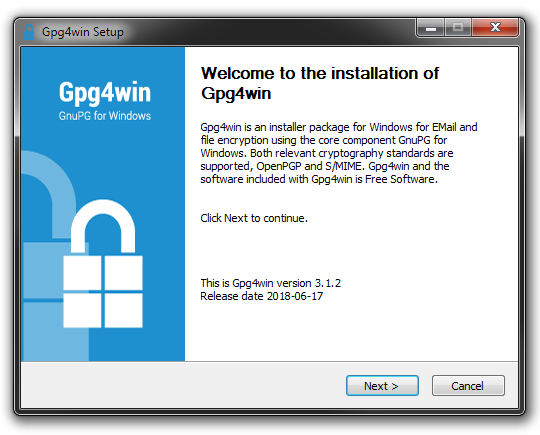
Step 2: Select Next.
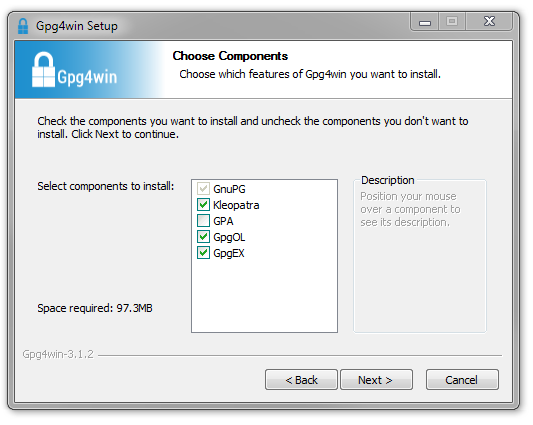
Step 3: Choose only the components: GnuPG, Kleopatra, GpgOL, GpgEX.
Step 4: Choose the install directory.
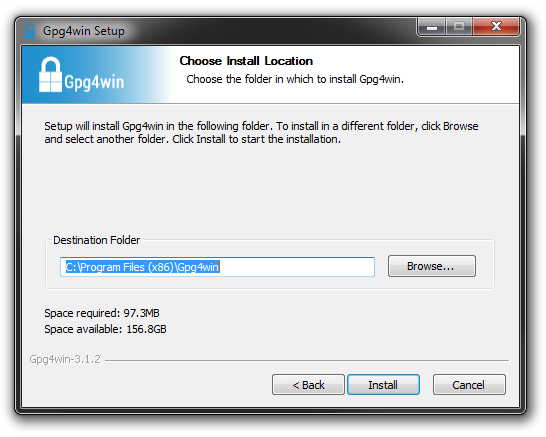
Click Install and follow the prompts.
Installing WinSCP
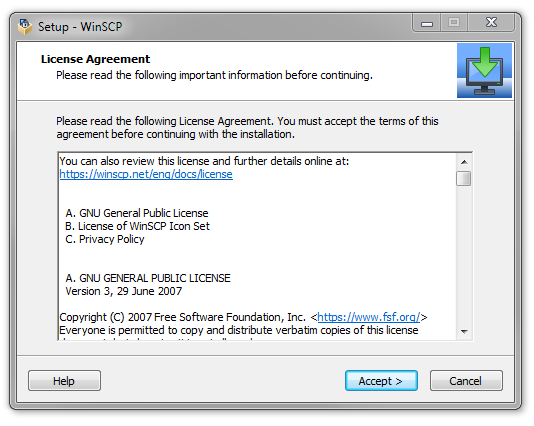
Step 1: Run the installer and accept the license agreement.
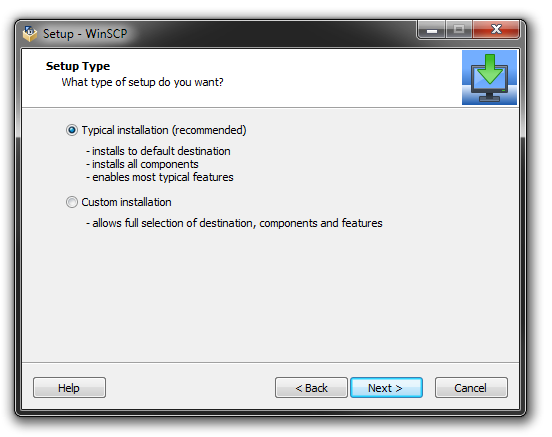
Step 2: Select typical installation.
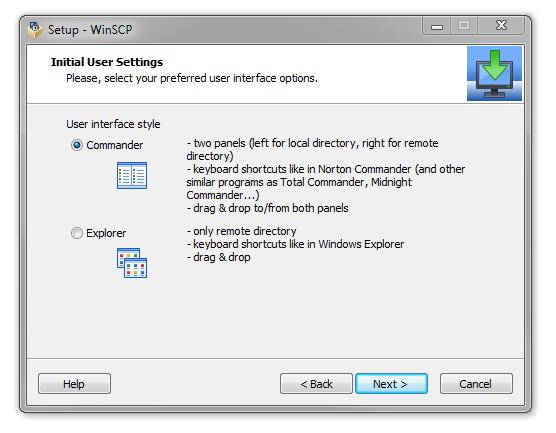
Step 3: Choose the default interface style.
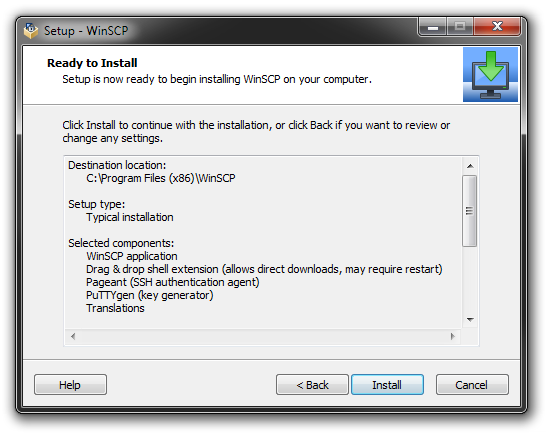
Step 4: Review the destination location and click Install.
GPG and SSH key generation
GnuPG RSA public/private key generation
Once GnuPG has been installed you need to generate a public key and private key. You will give the public key to partners you will exchange files with.
Both keys will be kept in your private and public key rings. Your private key ring will only contain your private key. Your public key ring will contain your own public key and the public keys of any other business partners (such as Westpac) who will provide your with their public key.
The steps are:
Step 1 - Create the Key Pair
The first step is to create:
- Your key rings.
- Your own public/private key pair.
Log onto the server that you installed GnuPG and change to the GnuPG installation directory.
Enter the following command:
C:\Program Files\GNU\GnuPG>gpg2 --gen-key

gpg2 (GnuPG) 2.1.0; Copyright (C) 2009 Free Software Foundation, Inc.
This is free software: you are free to change and redistribute it.
There is NO WARRANTY, to the extent permitted by law.

Please select what kind of key you want:
(1) RSA and RSA (default)
(2) DSA and Elgamal
(3) DSA (sign only)
(4) RSA (sign only)
Your selection? 1
RSA keys may be between 1024 and 4096 bits long.
What keysize do you want? (2048)
Requested keysize is 2048 bits
Please specify how long the key should be valid.
          0 = key does not expire
          <n> = key expires in n days
          <n>w = key expires in n weeks
          <n>m = key expires in n months
          <n>y = key expires in n years
Key is valid for? (0)
Key does not expire at all Is this correct? (y/N) y
You need a user ID to identify your key; the software constructs the user ID from the Real Name, Comment and Email Address in this form:
          "Heinrich Heine (Der Dichter) <heinrichh@duesseldorf.de>"
Real name: Stephen Macmillan
Email address: smacmillan@acme.com
Comment: Acme
You selected this USER-ID:
          "Stephen Macmillan (Acme) <smacmillan@acme.com>"
Change (N)ame, (C)omment, (E)mail or (O)kay/(Q)uit? O
You need a Passphrase to protect your secret key.
We need to generate a lot of random bytes. It is a good idea to perform some other action (type on the keyboard, move the mouse, utilize the disks) during the prime genPassword1eration; this gives the random number generator a better chance to gain enough entropy.
+++++
+++++
We need to generate a lot of random bytes. It is a good idea to perform some other action (type on the keyboard, move the mouse, utilize the disks) during the prime generation; this gives the random number generator a better chance to gain enough entropy.
....+++++
+++++
gpg2: key 682B25F2 marked as ultimately trusted public and secret key created and signed.
gpg2: checking the trustdb gpg2: 3 marginal(s) needed, 1 complete(s) needed, PGP trust model
gpg2: depth: 0 valid: 1 signed: 0 trust: 0-, 0q, 0n, 0m, 0f, 1u pub 2048R/A28F9F1C 2010-01-22
          Key fingerprint = 3230 E29F BA96 23D3 DA57 1D9E 204A B8F7 A28F 9F1C
uid           Stephen Macmillan (Acme) <smacmillan@acme.com>
sub       2048R/E5CA1204 2010-01-22
C:\Program Files\GNU\GnuPG>
Note that the pubring and secring are stored in the following locations. GPG2 knows these locations via the registry.
gpg2: keyring `C:\Users\StephenM\AppData\Roaming\gnupg\secring.
gpg2' created
gpg2: keyring `C:\Users\StephenM\AppData\Roaming\gnupg\pubring.
gpg2' created
To specify a different location of the key rings, use the ``--homedir` parameter. Please make sure these files will not be removed/deleted.
Step 2 - Export your public key
Once the public and private keys are generated you need to export your public key and provide it to Westpac (or any other business partner you will be exchanging PGP encrypted data with).
From the command prompt, navigate to the GnuPG folder.
Issue the command
gpg2 --output <filename_to_write_exported_key_to> -a --export <id_of_key_to_export>To check if a PGP public key was generated
type <filename_specified_above>The output of these commands should be similar to:
gpg2 --output acme_pgp_pub_key.txt -a --export smac
millan@acme.com

type acme_pgp_pub_key.txt

-----BEGIN PGP PUBLIC KEY BLOCK-----
Version: GnuPG v2.0.17 (MingW32)
mQGiBENF9oYRBACsnPgVd5OpJWIk0QzKtQxB/rmz4fxvK/T9Tjct1QpKRf9F9it0
8nBRBydViILOnp5LjwcaUyE11I6tJtx4ziJEj6OXw2zEJZtemLHlEwnPz96Pv3yp
ICiAkJsjmD8W5anoQN73E7bPV6XomNq/qSoX7iJnothCGZwlMqTxxWmbywCgjjBU
oKopCad9DC2jW/X+rofE5HUD/j9lF5ViVehWT+Mv2is97j0HfTDuuSdvw/nAP0Gp
vg1T8f9HQtHD4Ws73z2Gp6sat5z9x30ytlkDkPkuUeV5qKgXnazV2TcQ3zy5WQL0
50BWXY9aXqupta5F0bhR50Py3AJd86ENOfgAti69BC2wYcxLyGeQYujYyy39Pz6q
ezDkA/9nSWMvORndzo1TPZ7GL3wPZZraYxHEsi66Vt38L+OKvawWwW/nFl7A7+n8
jjf/Kb5amrQuX4k0Nr3 5wZbYXZs8J9Q/j6etxpU2OmjoZ9A2DQ3PhUasa4HgjRLC
XljzwKdKQJKDUOa8TNpGrTepVYt39WJZoTcGv3yV4/4k+4mYcrQ0U3RlcGhlbiBN
YWNtaWxsYW4gKFF2YWxlbnQpIDxzbWFjbWlsbGFuQHF2YWxlbnQuY29tPohgBBMR
AgAgBQJDRfaGAhsDBgsJCAcDAgQVAggDBBYCAwECHgECF4AACgkQMRzcKAb3MX4e
GwCghCnjfAxV4gN2Ou4Khv1T0OWzzhEAoIIP9WR/ruH9IlNZ03Z4j5EG8t7guQEN
BENF9ocQBAChnSqMG3urBUDxdVT3o2vxFI6s3lj0VBtPPavx3iAWIJksF+xtfvSb
s478+V5frryeHZpOIZTpoOBF5+ndtfrMF1gI4uJbaEtqKBRRjvFY3pZ4qas3D9yP
qa2EgoU8PuNbYIXNGFLn2RbHA//AKlgjWYNEeQnIoOTO5bdv6tjHHwADBQP8DhuP
QHkbAQYgM4rJP6nOEk9tBbhEiCJTKcVHjb+FuTBc4/zkcUqDh7pE8AKSB2rNH2Zm
KIiBkWoPTcCch6cYE15Rsb4qo5FDamYo2nhmTW/uNANulDUbl4jOM6TzyAVtG1V4
3nVRcCx2z4VlLPN36hu/j7VKCbsMQyVXYyIiNmiISQQYEQIACQUCQ0X2hwIbDAAK
CRAxHNwoBvcxfuG3AJ4hGj/ry4Wy9TXCsXPkaTREcijh2ACfXoCWU36YM+S9yJqx
X4neR119XaM= =6k85
-----END PGP PUBLIC KEY BLOCK-----
Upload this file using the iLink Connectivity Setup.
To check the fingerprint of your public key
gpg2 --fingerprint smacmillan@acme.comThe output should be similar to:
gpg2 --fingerprint smacmillan@acme.com
pub 2048R/A28F9F1C 2010-01-22
      Key fingerprint = 3230 E29F BA96 23D3 DA57 1D9E 204A B8F7 A28F 9F1C
uid          Stephen Macmillan (Acme) <smacmillan@acme.com>
sub 2048R/E5CA1204 2010-01-22
The above fingerprint is 3230 E29F BA96 23D3 DA57 1D9E 204A B8F7 A28F 9F1C.
Step 3 - Import Westpac's public key
Westpac will provide you with their public key to import into your public key ring. This is Qvalent's public key. This is a 2-step process. You firstly import the key then you digitally sign it to indicate that you trust the key.
To import the Qvalent public key
gpg2 --import <filename_of_file_containing_qvalent_public_key> [Enter]To verify the key was added to the keystore correctly, list the public keys in the public keyring
gpg2 --list-keysThe output from the above two steps should be similar to:
gpg2 --import 17155x01_qvalent_pub_key.asc
gpg2: key C2E36CC8: public key "17155x01" imported
gpg2: Total number processed: 1
gpg2:              imported: 1

gpg2 --list-keys
C:/Documents and Settings/user/Application Data/gnupg\pubring.gpg2
-------------------------------------------------------------------
pub 2048R/A28F9F1C 2010-01-22
uid           Stephen Macmillan (Acme) <smacmillan@acme.com>
sub 2048R/E5CA1204 2010-01-22
pub 1024D/C2E36CC8 2001-10-15
uid           17155x01
sub 2048g/2E52ED13 2001-10-15The Qvalent public key needs to be validated (assuming the imported key id was imported_key).
Validate the key
gpg2 --edit-key imported_keyYou should receive some text on screen and them a prompt that looks like:
Command>
At the Command> prompt within gpg2, type the following
sign
You should verify at this step that the Qvalent key is valid and that the key you are signing with is the key generated in the previous section. If you are confident of this, enter Y to sign the key.
Enter the passphrase of the keys generated in the Step 1.
Gpg2 will then take you back to the Command> prompt once completed.
At the Command> prompt press q to quit.
When asked to confirm the changes, press Y.
The output from these steps should be similar to:
gpg2 --edit-key test@qvalent.com

gpg2 (GnuPG) 2.1.0; Copyright (C) 2009 Free Software Foundation, Inc.
This is free software: you are free to change and redistribute it.
There is NO WARRANTY, to the extent permitted by law.
pub 1024D/AD8A9D42     created: 2001-11-01     expires: never     usage: SCA
                       trust: unknown          validity: unknown
sub 1024g/26787C6E     created: 2001-11-01     expires: never     usage: E
[ unknown] (1). test <test@qvalent.com>

Command> sign

pub 1024D/AD8A9D42     created: 2001-11-01     expires: never     usage: SCA
                       trust: unknown          validity: unknown
Primary key fingerprint: D732 F115 31BE 2DE1 40C9 185F 07F8 8DFE AD8A 9D42

      test <test@qvalent.com>

Are you sure that you want to sign this key with your
key "Stephen Macmillan (Acme) <smacmillan@acme.com>" (A28F9F1C)

Really sign? (y/N) y

You need a passphrase to unlock the secret key for
user: "Stephen Macmillan (Acme) <smacmillan@acme.com>"
2048-bit RSA key, ID A28F9F1C, created 2010-01-22

Command> q

Save changes? (y/N) y
Decrypt a file using GnuPG
Decrypt an incoming file
gpg2 --output <filename_to_write_plaintext> --decrypt <filename_of_encrypted_data>Enter password for private key.
Decrypt an incoming file in a batch-type environment
gpg2 --yes --output [filename_to_write_plaintext] --batch --passphrase-fd 0 --homedir [path_of_keyrings] --decrypt [filename_of_encrypted_data] <[filename_of_file_containing_password]An example of a batch file to do this would consist of:
gpg2 --y --output test_dec.txt --batch --passphrase-fd 0 --decrypt example.txt.asc <password.txtwhere password.txt contains your PGP private key password and is piped into the gpg2 command.
The output when this batch file is executed would be:
dec.bat
gpg2 --y --output test_dec.txt --batch --passphrase-fd 0 --decrypt test.asc <password.txt

gpg2: encrypted with 2048-bit ELG-E key, ID 2E52ED13, created 2001-10-15
          "17155x01"
gpg2: encrypted with 2048-bit ELG-E key, ID C45CC395, created 2005-10-07
          "Stephen Macmillan (Acme) <smacmillan@acme.com>"
gpg2: Signature made 10/07/05 15:49:30 using DSA key ID C2E36CC8
gpg2: Good signature from "17155x01"
Encrypt, sign and ASCII armour a file
Encrypt (and sign) data to send to Westpac (assume recipient key id is imported_Westpac_key, and your local key-pair id is local_key). When sending this encrypted data, it must also be ASCII armoured and compressed.
To encrypt and sign a file
gpg2 --compress-algo 1 --cipher-algo cast5 --armor --recipient imported_Westpac_key --local-user local_key --output <filename_to_write_encrypted_data> -se <filename_containing_data_to_encrypt>Enter password for private key.
Encrypt an outgoing file in a batch-type environment
gpg2 --compress-algo 1 --cipher-algo cast5 --passphrase-fd 0 --homedir [path_of_keyrings] --armor --recipient imported_Westpac_key --local-user local_key --output [filename_to_write_encrypted_data] -se [filename_containing_data_to_encrypt] <[filename_of_file_containing_password]An example of a batch file to do this would consist of:
gpg2 --compress-algo 1 --cipher-algo cast5 --passphrase-fd 0 --armor --recipient 17155x01 --local-user smacmillan@acme.com --output test_enc.asc -se test.txt <password.txtwhere password.txt contains your PGP private key password and is piped into the gpg2 command.
The output when this batch file is executed would be similar to:
enc.bat
gpg2 --compress-algo 1 --cipher-algo cast5 --passphras e-fd 0 --armor --recipient 17155x01 --local-user smacmillan@acme.com --output test_enc.asc -se test.txt <password.txt

Reading passphrase from file descriptor 0

You need a passphrase to unlock the secret key for
user: "Stephen Macmillan (Acme) <smacmillan@acme.com>"
2048-bit RSA key, ID A28F9F1C, created 2010-01-22

gpg2: checking the trustdb
gpg2: 3 marginal(s) needed, 1 complete(s) needed, PGP trust model
gpg2: depth: 0 valid: 1 signed: 1 trust: 0-, 0q, 0n, 0m, 0f, 1u
gpg2: depth: 1 valid: 1 signed: 0 trust: 1-, 0q, 0n, 0m, 0f, 0u

D:\Program Files\GNU\GnuPG>type test_enc.asc

-----BEGIN PGP MESSAGE-----
Version: GnuPG v2.0.17 (MingW32)
hQIOA38v4qEuUu0TEAf+IReSHiRz+v8Rfl6cqOJKxA/LRgY+3N24UnNIqXyDjuId
+rvCkgsgS2XJn6gukYXtsI7BaxNGGHvbKRaGb6XbcL62SW7lQol5a8N2uWai6wE/
qjILdOvDOpD6oqfMnk8CntVb4mIXJcQi+z6W+lJAHtHkJN2R8BRDoyqdTypIdJ+U
Z0sk1EjbZXVV1gJTj+uVy3LDvUiMOB1XMJn06lxz2nZQs4uzgRjqeGlI9x8HZS3d
tI5fz39hwZ4sn7CHDJ8qjhfxlo5U+Ebc7hwdhsD/OiAMbfcey96F+NjL0MVmNjr/
+vJ6Qgn9mIlcCZIWJT1cSOrogqrJMeWPY0KCrqXCXwf/eSBO/Rs/dDuyGDNIIhj3
do1xL4wbPUNtccwvqivPX8Q5dZPDBsH98VvIDaloHZuyeupO7gwkpS3zuesrB75L
JDbzVCgXEvXrS00CMi/on2R66gsBaEHmwGzaMLHVBTavrImWmR1kvL6CYMufloYg
MXbHF0ACEtR5DZ4PX6262OlnLKI+5St9EJ48zaYeJRT691IUqKqUIYNW9lnwOd7V
jjeA12iT74OPSAvzm6alAfN0Vz483vZdlavnid2Q/ijy2/PMA8ejZBqBs/idptej
Th5AuZcO9TI0tQEcyFxxIXM1AM/iZOhQUmvwAUGQWThta8Ri8fdhraupYyA5bZ0o
8MlzLRSAGO31hXLlBXUBUBH/4uhXpvE7n7dylCd8YDGl0ZAgypxQiuSGKzx01+s1
y1GHxP+xfo9dQaxqWbAtNfkf3hS3diz15T/URPKT0fFUe0gAsyH62CbahhOF/MJA
d9MF/0it3GwrDF5zHPC7tX7mJ8Nv2w== =mbYr
-----END PGP MESSAGE-----
WinSCP RSA key generation
Once WinSCP is installed you need to generate a SSH-2 RSA key pair that will be used to validate the WinSCP client to the Westpac SSH server.
The public key component will be provided to Westpac in the iLink Connectivity Setup.
Step 1: Run PuTTYgen which is included in the WinSCP installation. This can be accessed by selecting Tools -> Run PuTTYgen from the Login dialog.
Step 2: Use the default key parameters of RSA with 2048 bits and press the Generate button.
Follow the instructions to move your mouse around the screen while the key is being generated.
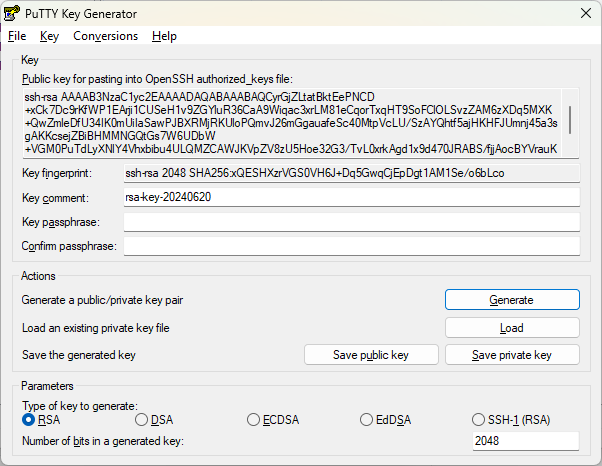
Copy and paste the value of the Public key for pasting into OpenSSH authorized_keys file field into a text file called <YourCompanyName>_ssh_public_key.txt. Replace <YourCompanyName> with your company name. This file will be provided to Westpac in the iLink Connectivity Setup.
Example public key output
ssh-rsa AAAAB3NzaC1yc2EAAAABJQAAAQEAkVmX0wQGQDqykRdxl18JGwhXch+ZG4BTXOL7DBy3EuzIZE0Rae5OA/AhmoHHPirf1/b6x4ojIA2OUaxCGv6rKHifnQiMzV4n5RYu0vhBD3SzTCkRwc2QvbUPUFopBby5e5bGPdBCHRcKeizXNtRivCUL6K+ds/wX3hy/yShoX3e1C0OPIJjHnxdRaDz5OSgdeuPCQAK5r/3uNZswwLY4m0mVN1i3BUQ3B4yPRRIB5nkHuHFpftXjkNezXue3IyQBHnuwOcinNto8O5DsVmEkZaNXVRJ/aeIG+c5D/+RqYpaWeHTRS1wjL91C2L+jAyMmekm96/YYTEspwpqAVMv9IQ== rsa-key-20240620Step 3: While PuTTYgen is still displayed, press the Save private key button and accept the passphrase warning.
Save the private key. Ensure that this private key is kept secure.
Testing the SSH connection
Before testing the connectivity between your SSH client and Westpac, confirm the following:
- You have provided your server's IP address and Westpac has confirmed that it has allowed that address through its firewall on port 22.
- You have allowed your server to communicate on port 22 through your own firewalls.
- You have provided your SSH-2 public key and your PGP public key to Westpac.
- Westpac has provided you with their PGP public key.
- Westpac has provided you with an SSH username and you have generated an SSH key.
To test the connection via Internet or Leased Line
To first check that you have connectivity try the following from your SSH client:
- Open a command prompt (cmd.exe).
- Depending on your network path try the following telnet command: a. Via Internet try:
telnet <host> <port>(replace with environment host and port). b. Via Leased line try:telnet <ip> <port>(replace with environment IP and port).
If you get a connection the screen should look like:
SSH-2.0-1.61 sshlib: WinSSHD 3.31
****yb**Ge*"***KE6diffie-hellman-group1-sha1,diffie-hellman-group14-sha1ssh-dssi
aes256-cbc,twofish256-cbc,twofish-cbc,aes128-cbc,twofish128-cbc,blowfish-cbc,3de
s-cbc,arcfour,cast128-cbciaes256-cbc,twofish256-cbc,twofish-cbc,aes128-cbc,twofi
sh128-cbc,blowfish-cbc,3des-cbc,arcfour,cast128-cbc+hmac-sha1,hmac-md5,hmac-sha1
-96,hmac-md5-96+hmac-sha1,hmac-md5,hmac-sha1-96,hmac-md5-96 zlib,none zlib,none****v
If the connection closes after a few seconds the SSH server is disconnecting you because you have not provided the IP address to Westpac to register in its SSH server. The SSH server is therefore disconnecting you because your IP address is unknown to it.
If the screen looks similar to the below then you cannot establish a connection so consult with your network personnel.
H:\>telnet ssiw.qvalent.com 22 Connecting To ssiw.qvalent.com...Could not open connection to the host, on port 22: Connect failedThis could mean one of a couple of things.
- If you are connecting to the TEST environment then it could mean that you have not opened your firewall for outbound connections. Westpac has no firewall restrictions on connections from the internet to its test environment.
- If you are connecting to production, then you must provide Westpac with your production IP address as you must open your own firewall and Westpac need to open there's as well.
If you can connect via Telnet you can now try connecting via WinSCP.
- Log onto the server containing the WINSCP and open a command window (cmd.exe).
- Change to the directory where WinSCP is installed i.e.
d:\program files\winscp3. - In the below substitute:
<user> username supplied by Westpac (remove angled brackets) <server> with the host/ip and port of the environment you wish to connect to.
Enter the following commands:
winscp3 /privatekey=ssh_private_key.ppk
winscp> open sftp://<user>@<server>
Output of this command will look similar to:
Initialisation...
Searching for host...
Connecting to host...
Authenticating...
Using username "user".
Authenticating with public key "rsa-key-20051006"
Authenticated.
Starting the session...
Reading remote directory...
Session started.
Active session: [1] user@server
If this is the first time you have connected your client to Westpac's SSH server you may get a warning like:
The server's host key was not found in the cache. You have no guarantee that the server is the computer you think it is.
The server's rsa key fingerprint is: ssh-rsa 2048 13:8f:b9:e8:56:9c:8a:b3:43:4d:71:21:45:c8:2c:ad
If you trust this host, press Yes. To connect without adding host key to the cache, press No. To abandon the connection press Cancel.

Continue connecting and add host key to the cache? (Y)es, (N)o, (C)ancel: Yes
Note that the fingerprint may be different to the above. You can confirm the fingerprint with Westpac. When the fingerprint is confirmed, then press Y. This warning will only occur once on the initial connection.
Best practices
Concurrent connection thresholds
There are limits to the number of SFTP connections that you can have open simultaneously. These limits depend on the environment you are connecting to:
| Environment | Concurrent connection limit |
|---|---|
| Test | 3 |
| Production | 6 |
To work within these restrictions, we recommend the following best practices:
- Releasing connections when a file transfer has been completed.
- Dedicating a pool of 3 connections to upload, and 3 to download (for production).
Troubleshooting
SFTP troubleshooting
Unable to connect to SFTP host
- Log on to your SFTP server and telnet to ssiw.support.qvalent.com port 22 (test) or ssiw.qvalent.com port 22 (production).
- If this fails, make the required network changes to allow your server to access the internet or update the firewall to allow connections to this server.
- If this is successful
- Confirm the correct URL has been included in your code.
- Check that your username and SSH key match the details in iLink.
- Confirm the IP address that your requests are coming from is in the list of IP addresses in iLink.
- Check the configuration of your SFTP client to confirm that you aren't trying to send a password.
- Notify your Qvalent implementation consultant who can confirm that the SSH key is loaded correctly on the SFTP server.
Prompted for password when trying to connect
- Confirm that the SSH key used in your connection matches the one loaded into iLink.
- Notify your Qvalent implementation consultant who can confirm that the SSH key is loaded correctly on the SFTP server.
Unable to place files on the server
- Confirm that you are looking for the file in the correct directory on your local machine.
- Confirm that you have the correct incoming directory configured in your code.
- Notify your Qvalent implementation consultant who can confirm the configuration of your user on the SFTP server.
Unable to download any files
- Confirm with your Qvalent implementation consultant that there is a file in your outgoing directory to download.
- Confirm that you have the correct outgoing directory configured in your code.
- Confirm you are looking for the correct filename if your code is set to get a particular filename.
- Confirm that you have permission to write to the destination directory on your local server.
PGP Troubleshooting
Prompted for PGP key password
Confirm that the password.txt is in the GPG directory and contains the correct password. You may also need to delete, run the script and recreate the file to pick up any changes.
FAQ
When I decrypt a file with GPG2 I get the following WARNING:
gpg2: encrypted with 2048-bit ELG-E key, ID 2E52ED13, created 2001-10-15
          "17155x01"
gpg2: encrypted with 2048-bit ELG-E key, ID C45CC395, created 2005-10-07
          "Stephen Macmillan (Westpac) <smacmillan@acme.com>"
gpg2: Signature made 10/07/05 15:49:30 using DSA key ID C2E36CC8
gpg2: Good signature from "17155x01"
gpg2: WARNING: message was not integrity protected
This is a compatibility issue between GPG2 and eBusiness server and can be ignored. The important line to note is "Good signature from 17155x01" This tells you that the file has not been tampered with.
When I encrypt a file using GPG2 I receive the following WARNING even though I have imported Westpac's key and signed it:
It is NOT certain that the key belongs to the person named in the user ID. If you *really* know what you are doing, you may answer the next question with yes.

Use this key anyway? (y/N)
Try setting the trust level on the key using the command: Gpg2 -edit-key <key name>.
Set the trust level to ultimate.
When I encrypt a file using a batch program with GPG2 and the file already exists the batch job stops and prompts me to about replacing the file:
File 'XXX.asc' exists. Overwrite? (y/N)
Try using the parameter --yes on your GPG2 encrypt / decrypt command line. This will automatically answer 'Yes' for most questions GPG2 prompts for i.e.
gpg2 --yes --output [filename_to_write_plaintext] --batch --passphrase-fd 0 --homedir [path_of_keyrings] --decrypt [filename_of_encrypted_data] <[filename_of_file_containing_password]How do I poll for multiple file names multiple times a day and ensure I don't miss any or pick up the same files twice?
- Create a directory on the Westpac server call
PROCESSING. - Do an SCP move
*all the files in theOUTGOINGdirectory into thePROCESSINGdirrectory. This will move all the current files into thePROCESSINGdirectory and delete them from theINCOMINGdirectory. - Iterate through the
PROCESSINGdirectory fetching the files. Once a file is fetched either delete it or move it to a sub directory calledPROCESSED.
I'm trying to interactively connect to the Westpac server using an SSH client, but it is not working properly. I'm getting 'access is denied' errors?
You cannot connect interactively using an SSH client. You must use an SFTP client.
Can a file be encrypted with more than one public key?
Yes.
Westpac always encrypts files that it is sending to customers with both the customer's public key and Westpac's public key.
This allows a customer that is having difficulty decrypting a file (it may have become corrupted in transit) to send it back to Westpac to test decrypting it.
How can a file be encrypted with more that one public key? Doesn't this make the file twice as big?
No.
When GPG2 encrypts a file it generates a random session key and uses this random key to do the actual encryption. It then encrypts this session key with the recipient's public key and appends this data to the encrypted file. As Westpac always encrypts an outbound file with its own public key, the session key is also encrypted with Westpac's public key and this data is also added to the encrypted file. So encrypting with additional public keys only makes the file slightly larger. By doing this either the recipient or Westpac can use their private key to decrypt the session key which inturn is used to decrypt the file.
When I receive an encrypted file how do I know what public key(s) it has been encrypted with?
Use the following gpg2 command:
# gpg2 --list-only --decrypt <file name> gpg2: encrypted with 2048-bit ELG-E key, ID 26787C6E, created 2001-11-01 "test <test@qvalent.com>"I have a different third-party SFTP software solution and need assistance
We will offer assistance with other third-party SFTP software solutions on a best endeavors basis only. The types of checks we can help with are:
- ensure the setup and configuration of the customers SFTP client software performs similar steps as we have documented.
- ask you to look up the commands in your documentation and provide this information.
If we cannot resolve your issue, we recommend the customer submits a technical support case with their SFTP software vendor.
Cannot open a socket to our SFTP server: 'connection refused' errors
Such an error may look like this:
www_uat@VELWWW02:~/public_html/uatcranks$ sftp -b
/home/www_uat/public_html/uatcranks/wibsbatch/script.cmd
-oIdentityFile=/home/www_uat/public_html/uatcranks/wibsbatch/ssh_private_key
 velosurescp@ssiw.qvalent.com
ssh: connect to host ssiw.qvalent.com port 22: Connection refused
Couldn't read packet: Connection reset by peer
Or the error may look like this:
winscp> open sftp://user@ssiw.support.qvalent.com:22
Searching for host...
Server unexpectedly closed network connection.
To resolve perform a telnet test. telnet is a software utility commonly found and available on many popular operating systems for use as a debugging method. The 'telnet test' allows us to verify whether we can open a TCP/IP connection from a specific client source IP to a specific destination IP on a specific destination port.
Test environment
telnet ssiw.support.qvalent.com 22Production environment
telnet ssiw.qvalent.com 22The expected output is similar to SSH-2.0-5.39 FlowSsh: Bitvise SSH server (WinSSHD) 6.47. Any other output means that no successful network path can be established.
If the telnet test is not successful:
- the source IP address of connection attempt is not the same as address specified in the iLink Connectivity Setup, OR
- there is no connection path from your server to our server on tcp/22.
Receiving an error indicating they cannot validate/verify the our SFTP server's host key
This can indicate you are connecting to our SFTP server, however your software has not trusted our server's known host key. If this is the case, you should add the known host key provided to in the iLink Connectivity Setup for the SFTP environment you are connecting to and add this into their known SSH known host key keystore.
In these cases, since there is no SSH tunnel being established, we need to your logs to debug this issue if you require further assistance.
Some examples of this error are:
WinSCP error example
Searching for host...
Connecting to host...
Authenticating...
The server's host key was not found in the cache. You have no guarantee that the server is the computer you think it is.
....
....
....
Host key wasn't verified!
Authentication failed.
OpenSSH error example
WinSCP error example
The authenticity of host '<HOST HERE>' can't be established.
RSA key fingerprint is ........
....
....
Host key verification failed.
Connection closed
Bitvise SSH Client error example
10:32:11.427 Bitvise SSH Client 6.23, a fully featured SSH2 client.
Copyright (C) 2000-2015 by Bitvise Limited.
10:32:11.427 Visit www.bitvise.com for latest information about our SSH2 products.
10:32:11.427 Run 'BvSsh -help' to learn the supported command-line parameters.
10:32:11.924 Loading default profile.
10:32:11.955 Started a new SSH2 session.
10:32:11.957 Connecting to SSH2 server xxxxxx:22.
10:32:11.967 Connection established.
10:32:11.973 Server version: <SERVER VERSION HERE>
10:32:11.973 First key exchange started.
10:32:12.009 Received a new host key from the server. Algorithm: RSA, size: 2048 bits, MD5 fingerprint: xx:xx:xx:xx:xx:xx:xx:xx:xx, Bubble-Babble: xxxxx-xxxxx-xxxxx-xxxxx-xxxxx-xxxxx-xxxxx-
10:32:12.009 The received host key has been rejected. Reason: xxxxxxxxxxxxxx
10:32:12.138 The SSH2 session has been terminated.
Can connect, but receiving a specific SFTP application specific error such as 'login failed'
The most common cause is that you are logging in using a password rather than Public Key, and you may have locked your account.
If this occurs, configure your SFTP client to only use username and public key authentication and never use password authentication. This may need to be stopped first before an unlock can be performed and service be returned.
Can connect, but receives an application level 'Access is Denied' error.
This is an indication that you may be using an SSH client to try and open a terminal shell to the server, rather than use SFTP. The use of SSH terminal sessions is not permitted.
Can connect, but receiving a Password prompt
This is due to a customer either
- Not attempting to authenticate with a username+SSH key.
- Authenticating with an incorrect SSH key. You may be using the Test key in Production or the Production key in Test.
- Authenticating with the correct SSH key. The key may not be loaded in the SFTP server.
Can connect, login, but cannot receive your files (Customer Polls for Files)
Check that you have attempted to pick up a file from your Outgoing folder. If you have, provide these logs with a date/time stamp for the attempt.
Attempt to connect, the error 'The specified account password has expired' is logged in Bitvise SSH Server logs
There may be an error in the setup for your SFTP account. Please contact your Westpac implementation manager.